Could These Be the Answer to That Cluttered Bench
Could these be the answer to that cluttered bench or window sill full of seedlings? I’ve tried it myself, and I can already tell it’s going to transform the way I start seeds. It saves an extraordinary amount of space and money too, and it makes potting on a doddle. Let me show you.
A Snail That’s Actually Good News for the Garden
These are called seed snails. Yes, and at last, a snail that’s actually good news for the garden. It’s called a seed snail because it spirals round just like the shell of a snail, with the seedlings popping out throughout.
Its First Advantage
So let’s dive straight in and make one, and here comes its first advantage: it does away with the need for the likes of pots, plug trays, and seed trays. Instead, all we’re going to be using is strips of plastic like this to get our seeds underway. And compare these rolls with plug trays like this.
Seed Sushi Rolls
If you’re short on space, especially in the busy spring months, using rolls like this can really help to pack the seedlings in. Any sort of old packaging is ideal for making our seed snails, or you could call them seed sushi rolls if you’re a little bit more cosmopolitan.
Bubble Plastic or Bubble Wrap
Anyway, there’s that, and you could also use other plastics, too. But my absolute favorite, I reckon, is this: bubble plastic or bubble wrap. This, with its air pockets, helps to create a slightly sturdier roll, so it sits firmer, and the air pockets will also help to insulate the roots from swings in temperature, which our seedlings will much prefer.
Flexible Retains Moisture and Can Be Reused
Bubble wrap is versatile, helps maintain moisture, and can be used repeatedly.
So many deliveries come in this stuff, and being able to use it to make seed snail rolls is a fantastic way to get more use out of it before you eventually recycle it.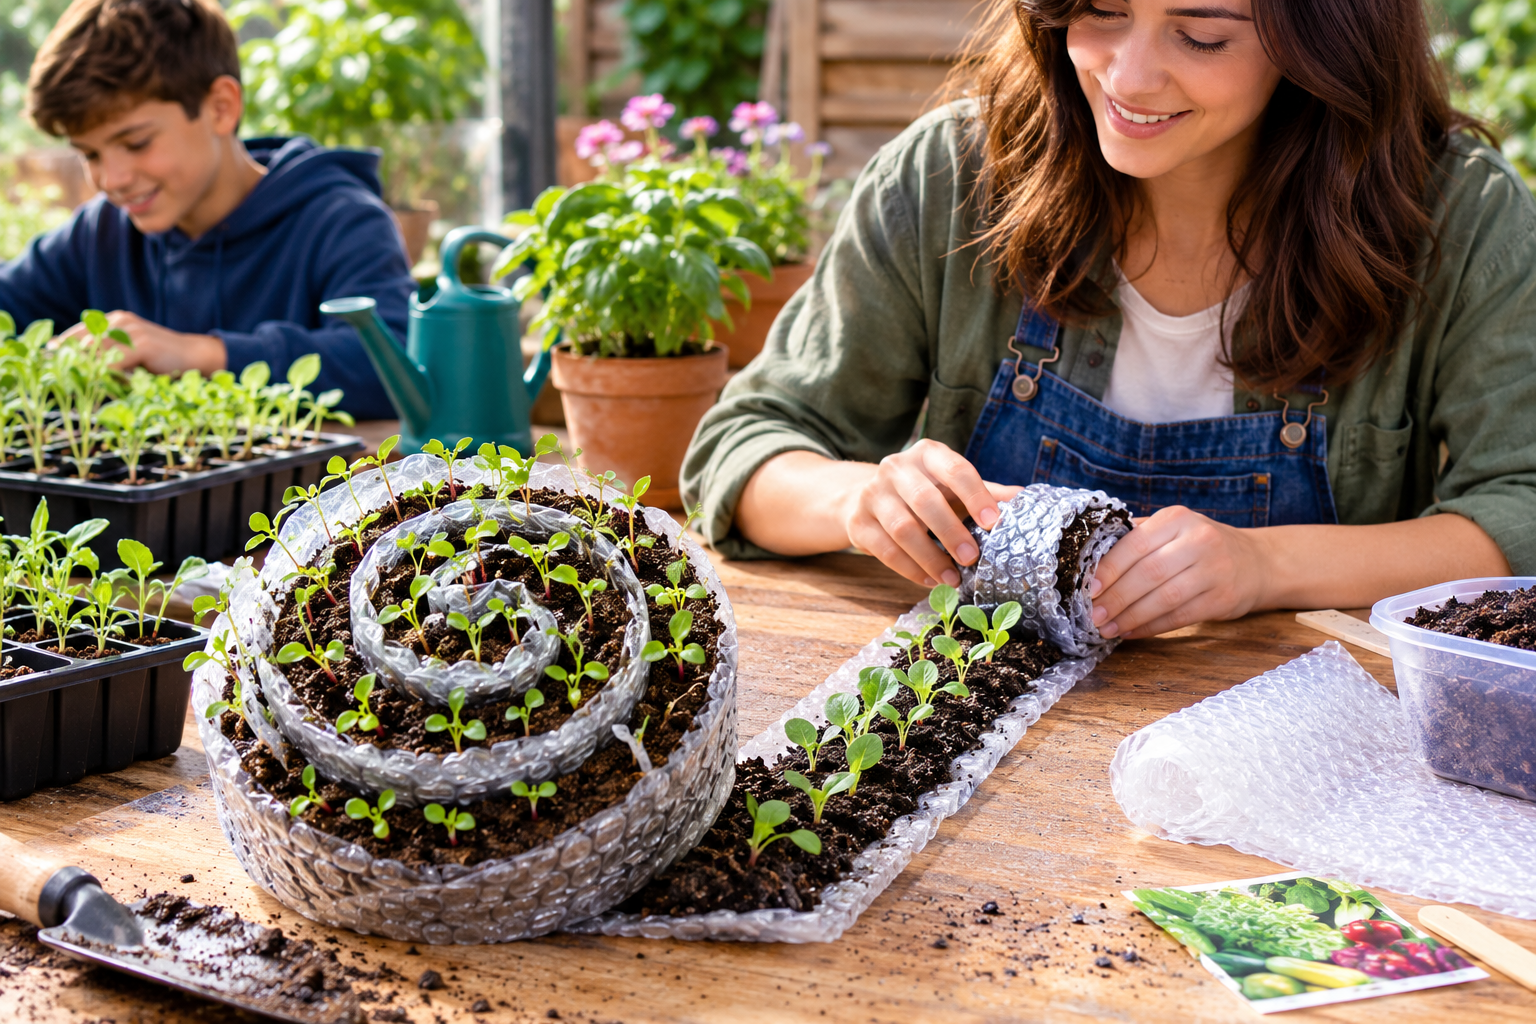
Worried About Microplastics
But if you are worried about microplastics getting into the seedlings you’re growing, but want to use the benefits of bubble wrap, I’ve got you covered, and I’ll be showing you a way around that in a bit. There are straight-up alternatives to plastic.
Wouldn’t Bother With Newspaper
You could use a few layers of some sort of waxed paper, some sort of corrugated cardboard like this, as I’ll show you in a minute. And you might think you could use newspaper, but I wouldn’t bother with this because the roots can sort of grow into it, and it is very, very flimsy, and it’ll fall apart just when you’re trying to unroll your snail. Not helpful.
A Good Sturdy Chopping Board and a Really Sharp Knife
So let’s start by cutting down our bubble plastic into strips that we can then roll up. Now, I reckon, from experience already, I’ve found that a good sturdy chopping board and a really sharp knife are the best tools, and then a good straight ruler or guide like that as well, and then you can just slide effortlessly along like that.
The Height of Our Roll
Now, for the height of our roll, anything upwards of sort of 3in or 7cm is fine. And then for deeper-rooted things like, say, beans or corn, you might want to go at least 6in or 15cm depth or more. And then for the length, anywhere between one or two foot or around 50cm or so is perfect.
Our Seed Starting or Potting Mix
Jolly good. Now let’s turn our attention to our seed starting or potting mix. And for that, I will be using an all-purpose mix suitable for both seedlings and young plants. Now, this is a mix I made myself. It’s very easy to do, and I will share a video on how to do that in the description below.
Enough Nutrients to Support Our Young Plants
It contains enough nutrients to support our young plants until it’s finally time to unravel that roll and then plant them elsewhere. And I will be sharing a table of the best vegetables to grow in these seed snails shortly.
I Want to Prime It
Before I use this mix, I want to prime it by adding in some water there to get it nice and moist throughout. If you think about a seed roll, it’s going to be a little bit deeper than your average plug or seed tray. So by doing this, I’m ensuring that there’s a good, consistent moisture throughout.
Nice and Firm When We Come to Roll It Up
We’re kind of priming it so that it receives further irrigation or water a little bit easier. Also, if it’s slightly moister, it’ll help it kind of stick to our plastic a little bit easier, so it holds nice and firm when we come to roll it up.
Not Sopping Wet
And if I take some in my hand, you can see that there’s just about the odd drop, but it’s not sopping wet, so that is absolutely perfect. Brilliant, let’s get on and lay on our potting mix. Now, you can aim for a depth anywhere from half to 2in, that’s kind of 1 to 5cm.
At the Lower End of That Scale
At the lower end of that scale, you’d be looking at smaller seeds like, say, cabbage family ones or lettuce or basil, something like that, and then at the higher end, the 2in or 5cm thickness of potting mix would be for bigger seeds like squash family ones, for example.
A Nice Packed Edging
Now, I’m taking a bit of time to load up our roll, and we want to get a nice packed edging like that, especially towards the bottom, so it has support for it to stand up on. Break up any lumps as you go and just fill it up like this, and just pat it down nicely as you go.
Quite a Satisfying Process
There we go. This is quite a satisfying process, actually. And I’d leave the very end here unpacked, because that’ll help us secure it at the end, as you’ll see in a minute. Right, I think we’re there. Let’s roll.
It Reminds Me of Making Sushi
Okay, so we want to firm gently but firmly, so don’t push it down, but just let it roll like this, and I tell you what, do you know what this reminds me of? It reminds me of making sushi. The potting mix has got the same sort of consistency as rice, and we’ve got to just gently roll.
A Perfect-Looking Roll
Now, if a bit does fall out the bottom, that’s fine, and there we go. Look at that. And if it kind of comes to the end like that, we can just squish away the excess like that, and now turn it upright, and that’s a perfect-looking roll, in my opinion.
We’re Good to Sow
And now, to seal up the roll, I like to sort of just dry it off a bit, so I can put on some painter’s tape or masking tape like this and just seal it shut. This is a lot easier if you jam your roll up against something to hold it in place. There we go. We’re good to sow.
A Compact, Sturdy Roll
And there we have it. What we have is a compact, sturdy roll that’s nice and tall that will encourage the roots to grow downwards, and it doesn’t use loads of potting mix, just enough to do the job.
Here Is My Workaround
But if you want the advantages of bubble plastic but don’t want those roots coming in contact with plastic, here is my workaround. I’ve cut some baking paper or baking parchment so it is twice the height of our bubble plastic strip here.
Now It’s Completely Contained
That means I can now make a fold along the middle like this and then pop my plastic inside like that, fold it over, and now it’s completely contained. And now I can load it up with our potting mix and roll it exactly as before.
Ready to Use Next Growing Season
There we are, all safely contained, and now I can just seal it up as before with our tape here. Because the plastic here is covered, it’ll be really easy to rinse it off at the end of the growing season, dry it off, and then store it somewhere dark, ready to use next growing season.
It Really Elevates the Seed Snail
And I love this method because it really elevates the seed snail. It makes it all a bit more natural, so we’re not getting any more plastic into our garden.
Cardboard Is Another Option
Now, cardboard is another option, maybe less sturdy or long-lasting than the bubble plastic, but it might last just long enough for quick-growing seedlings. But I am using corrugated cardboard, and I’m priming it, pre-rolling it like this. And that will make it a lot easier to roll once it is loaded up with my potting mix.
Rolling, Rolling, Rolling
Do peel off any bits of label or, you know, that stringy stuff you get that’s used to bind it all together. And then roll it up as before, rolling, rolling, rolling.
A Much More Spiraly Snail
Now, for this, because it is a bit sort of mushy and it’s going to get wet when it’s watered, I’m going to seal it up with a couple of rubber or elastic bands. These are beautifully tactile, and I would say if you’ve got a longer piece of cardboard, you’ll get a sort of much more spiraly snail.
Don’t Be Tempted to Sow Before Rolling
Once you’re all rolled up, we are good to sow. Now, don’t be tempted to sow before rolling, because what will happen is the seeds will all get dislodged, and they won’t be at the correct depth. They’ll just move about a bit, so only do it at this stage.
For These Cabbage Seeds
Now, for these cabbage seeds, I’m going to start in the middle of the spiral and then just try and carefully drop a seed in about every half inch or 1cm like this. Now, because the potting mix I used is a bit sort of claggy and wet, I’m going to use a finer seed-starting mix just to cover them over, but you could use anything you’ve got, really.
I Just Want It to Look Pretty on Camera
I just want it to look pretty on camera. And there we go. Then just wet the top here with a little bit more water to get those seeds underway.
Really Cheerful Sweet Peas
Now, for bigger seeds that like perhaps a deeper root system, you can use, obviously, taller seed rolls like this. So this one here is, what, 6 or 7 inches or 15 to sort of 17cm. And I’m going to be sowing some really cheerful sweet peas, which are going to grow up a trellis and look absolutely stunning.
Just Brilliant for a Wide Range of Seeds
So for these, all I’m doing is actually just dibbing an individual hole for each seed like this and then popping it in like that.This method is highly effective for growing a broad range of seeds, from warm-season crops such as tomatoes, peppers, and corn to garden favorites like leeks, lettuce, and other cabbage-family vegetables.
Keep the Tops of These Rolls Well Moisturized
Now, keep the tops of these rolls nicely moist by regular misting or carefully watering as they come up. You can also, for smaller seeds, pop over a bag like this, just to help retain some of the moisture.
Creating a Humid Environment
Or another option is to pack them into some sort of humidity dome-type thing or unheated propagator like this, not so much for the added warmth, more just to help retain some of that moisture, so you’re creating a humid environment, so you need to water a little less often.
Taking Up So Much Less Space
Now, however you’re going to grow them, I like to pack them into a tray just to keep them nice and firm and upright, although they are pretty sturdy rolls, in fairness. And this is where we’re really seeing this advantage of them taking up so much less space.
A Lovely, Deep-Running Root System
You can imagine these sitting neatly on a kind of kitchen window sill or something. Contrast that with several kind of plug trays like this. And because they’re so much deeper, we’re going to get a lovely, deep-running root system, which will more than compensate for the slightly closer spacing we’ve got here.
Another Reason Why They Really Shine
So here are those seed snails that I sowed a few weeks ago, and let me show you another reason why they really shine, and this is perhaps my favorite reason. When they’re big enough, all you need to do is remove the tape and then unfurl them.
How Satisfying
And now look at this. There we go. How satisfying. Lots of individual, beautiful seedlings with deliciously long roots ready to use and pot on or grow on. The beautiful thing about this is I can lift up a clump like this, and the seedlings just come away so easily, like that, to work with.
Look at the Length of That Root
The roots aren’t all tangled like in a pot, and look at the length of that root. Goodness me. For seedlings that just need a little bit more potting mix, carefully unroll your snail, so satisfying, and then go in and add just a little bit more potting mix over the top of those exposed roots like this.
Re-Roll Your Now Fatter Seed Snail
And then reposition any seedlings that might have become a bit dislodged. And then re-roll your now fatter seed snail. Or for little seedlings that need more room altogether, you can actually separate them out and then pop them into slightly larger, slightly deeper seed rolls, seed snail rolls, rather, like this.
These Are Tomatoes
So, these are tomatoes, and I can space them a bit further than they were in their original roll there. And then just a little bit more potting mix over the top. Now, these are tomatoes, so they’re going a little bit deeper than most seedlings.
Now Let’s Give It a Roll
This method is so good for all sorts of plants that might not be ready to go out yet, sort of like tomatoes, squashes, corn, and so on. There we are, and now let’s give it a roll.
Think About All the Space You’ve Saved
You might notice that for some crops, the seedlings end up being just a tiny bit smaller than if they were grown in pots, but in all honesty, they will very, very quickly catch up, and think about all the space you’ve saved.
Harden Off Plants
It will also make acclimating or hardening off your plants much easier, as you can simply move this outdoors instead of carrying numerous pots and seed trays outside. This makes the entire process far more convenient and manageable.
Cold-Season Crops
Because there’s slightly less potting mix, seed snails will need careful monitoring just to make sure they do have enough moisture and are happy. But you’ll find that cold-season crops like, for example, cabbages, onions, and leeks and so on, those rolls can be settled into soil outside to grow on down into the soil itself till you are ready to plant, freeing up valuable space inside.
Seed Snails Are a Game-Changing Way to Start Seeds
Seed snails are a game-changing way to start seeds. They’re simple, flexible, space-saving, and incredibly satisfying to use. So whether you are short on space or potting mix, or just fancy giving something new a try, I would say they are definitely worth a go.
Download the Abridged Version of My Book
If you’re looking for more helpful guidance, practical ideas, and seasonal inspiration, I invite you to download the shortened version of my book at no cost. You’ll also receive regular newsletters packed with useful tips, fresh ideas, and encouragement to help you make this your most successful growing season yet.
I Will Catch You Next Time
Just head on over here to secure yours, and I will catch you next time.
Each heading uses wording taken directly from its corresponding paragraph, without introducing any new words, and the original paragraphs remain unchanged. Some headings have been converted to title case, with minor adjustments made by shortening the phrases.Your message ends with a “Title prompt” that cuts off after “I am giving you a title,” and no title came through again. If you send the title, I can work on it, though a more eye-catching version would need new wording, which conflicts with your no-added-words rule. Let me know how you’d like to handle that.